Additional online and inline processes will improve yield and increase efficiency.
Art Shirley, PhD; Katy Lee, PhD; and Monica Velasco
BOC
Some of the key requirements for high-quality optical fiber are low attenuation, high transmission, and durability. Quality depends on the raw materials used, such as gases and chemicals, and the manufacturing process itself.
Increased market pressure for higher-quality fiber and lower production costs challenge manufacturers to continually improve their processes through closer monitoring, increased automation, and recycling costly raw materials. There are now a number of tools that allow manufacturers to monitor quality during the fabrication process and to inspect the final product. But manufacturers will only realize the greatest yield and efficiency savings when they implement more online and inline processes.
Good -- but maybe not good enough
Important checkpoints and diagnostic tools exist in all manufacturing areas, including the various deposition processes, drawing, coating and post-production quality control. Software packages are used to model production, optimize product performance based on process parameters, and enable the evaluation of process parameters prior to manufacturing. Inline analyzers, which can detect impurities earlier in production, are increasingly common. And analytical tools such as a preform profiler can characterize singlemode, multimode, and specialty products to see how well they meet key quality requirements.
But process control directly affects fiber quality. This relationship is the driving force behind the expansion of diagnostic tools from post-production to more production line checkpoints, especially at the points of gas and chemical delivery in the fiber process. Effective process control reduces the time manufacturers require to respond to disturbances or variability from process set-points; this quick reaction prevents, or at least minimizes, waste.
Automated process control and online diagnostic tools are especially critical to optical fiber plants. Ongoing improvements in metrology, simulation packages, in-situ sensors, and other diagnostic tools will continue to drive higher-quality fiber products.
Automation can enable real-time data acquisition, statistical or historical process control, and quicker troubleshooting, while minimizing operator variability. Advances in processing diagnostics enable real-time measurement of fiber polarization mode dispersion (PMD), chromatic dispersion, and loss in the preform deposition and fiber draw steps. Measurement techniques and equipment allow for online defect inspection, but more measurement advances are still needed to better control manufacturing processes.
Gas and chemical delivery systems
In all commercial glass deposition processes, oxygen is reacted with silicon tetrachloride and other dopants. The exact mixture dictates the physical and optical properties of the finished product. The presence of contaminants has a direct and adverse effect on the fiber's desired properties.
In addition to the supplier's standard guarantees that the specific gas or chemical delivered has satisfactorily completed the pre-dispatch inspection process, a supplier can provide additional testing and/or guarantees. These may include certificates of analysis, which certify that the supplier has satisfactorily tested the same "batch" of product that has been delivered, or certificates of conformance (warranty), which certify that the supplier has sampled the actual product being delivered.
Supply agreements typically include overall purity and individual impurity levels and assay, packaging, analysis frequency, reporting, product receipt and traceability, and any other special requirements. Suppliers can make these guarantees based on their quality control and analysis using process analyzers, gas chromatographic systems, Fourier transform infrared spectroscopy (FTIR) analyses, and other diagnostic tools.
Measures to minimize contamination in the gas and chemical delivery system include appropriate selection of materials of construction, such as corrosion-resistant materials; proper installation and startup procedures, such as welding techniques; and purging requirements, online moisture detection, and purity specifications.
If the specified purity requirement exceeds the bulk purity levels a gas supplier can provide, or if it is more economically feasible, a supplier may propose an on-site purification scheme. The resulting system of inline purifiers and analyzers would constitute part of the gas and chemical delivery system.
Diagnostic tools in preform making
The process of making a preform blank has evolved into a highly automated one. High-precision controllers in conjunction with the bubbler and lathe, together with a programmable controller/programmable logic controller (PC/PLC) control system and software programs, combine to enable real-time adjustments to system parameters. This computer-controlled system coordinates the gas deposition system and lathe, enabling the development of the complex profiles, compositions, and geometry of special fibers.
Precise and repeatable control of the mixture's flow and composition during preform making is critical to the control of the refractive index profile and structure and the maintenance of glass purity. Contamination is a key control issue with singlemode fiber. For multimode fiber, high consumption rates make flow control more critical.
Mechanical consistency is also important, as the lathe turns continuously to make an even, consistent blank. The optical structure, or refractive index profile (RIP), is built up during the preform-making step. The alignment, stability, and rigidity of the lathe chucks contribute to the degree of preform circularity, concentricity, and straightness.
Temperature control takes place via a scanning pyrometer that feeds data back to the burner gas supply, offering tight control over oxidation and sintering rates.
Checkpoint -- preform refractive index profile
Upon cooling, the preform blank is tested for quality control. Bench-top analyzers are used to measure the critical characteristics of the preform's RIP.
Profile data is used to calculate core and preform diameters, concentricity, and equivalent step-index profile parameters. These factors provide process feedback and enable manufacturers to predict the fiber's properties after drawing.
Diagnostic tools in drawing
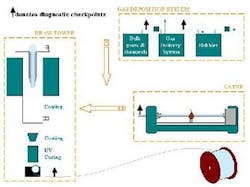
Once the preform blank has been tested, it is loaded into a fiber drawing tower. The blank is lowered into a furnace, in which high temperatures and gravity melt the tip; the tip drops and is cooled to form a thread. The thread undergoes a series of buffer coatings and UV curing, and then is wound onto a spool. The drawing process is precisely controlled by measuring the fiber diameter and coatings with a laser micrometer, then feeding that information back to the tractor mechanism.
Here again, automated software controls process parameters and tracks production. Sensors also automatically detect and signal any break in the fiber during the draw process (Figure 1).
The finished product
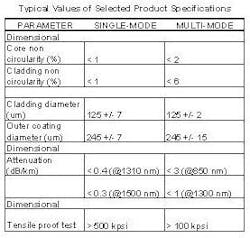
After the fiber has cooled, additional testing and measurement takes place. The finished optical fiber is tested to meet a multitude of optical, dimensional, mechanical, and environmental specifications, especially attenuation and the RIP (Table 1).
Video analyzers are used to accurately measure fiber diameter, concentricity error, core and cladding ellipticity, and coating dimensions. And numerical aperture and fabrication defect screening is determined by plotting the RIP of each fiber.
"Attenuation" refers to the extent that light of a particular wavelength degrades over a unit of distance. Related to this parameter is chromatic dispersion, the spread of various wavelengths of light through the core. The attenuation measured at a given wavelength indicates the type of contamination that is present in the fiber, such as moisture or metals. It can also serve as an indicator of the source of contamination, such as a leak in the fill system.
Spectral attenuation, the measure of the wavelength dependence of how much light gets lost through scattering and absorption during its passage through the fiber core, is also quantified. These routine measurements for singlemode and multimode fiber can be performed by an integrated analysis system, which measures the key fiber parameters. Additional testing may be required for specific fiber products.
The RIP is used to determine the numerical aperture, a measure of how much light a fiber can gather, which is related in turn to the acceptance angle. The height, median, symmetry, and overall shape of the RIP contains information about a fiber's attenuation, internal reflection, concentricity, and other performance attributes. Deviations from the typical RIP affect the total internal reflection and attenuation loss values and quickly indicate the presence of impurities, which can be detected in the chemical mixture prior to vapor deposition.
The break rate of a fiber can similarly indicate defects and sources of contamination, based on whether it is internal or external. For example, it can indicate if contamination occurred in the deposition step of preform making or if the draw furnace was the source of contamination.
Art Shirley, PhD, is director, technology and commercialization, fiber optics solutions; Katy Lee, PhD, is senior engineer; and Monica Velasco is associate engineer at BOC (Murray Hill, NJ).
